What is your top 5 ……

So my husband and I were having this conversation the other day and decided to start talking about what were our favorite top 5 ethnic foods. Now this one seems a little tough because I honestly have a favorite in pretty much every country out there; so to narrow it down to 5 was tough but in the end I came up with my top 5.

1) Italian – Pasta, Pizza, Risotto, Prosciutto, Salame, Cheese (parmiggiano, asiago, pecorino, mozzarella di bufala, squacerone, stracchino, ricotta, etc..), Fiorentina steak, Pandoro and Panettone, Crostacei (crustaceans), Prosecco, Wine (Amorone, Chianti, Brunello di Montalcino, Pinot Nero, Nebbiolo, Barbera, Gavi, Pinot Girgio, etc), Etc…

2) Japanese – Sushi. Honestly one of my favorite foods ever! I could literally eat this everyday. I could die at Samurai Blue in Tampa, FL eating the following: Spicy Tuna Sashimi, Tuna Tataki, Emperor’s roll, Spicy Tuna roll, Tuna Summer of Love roll, Volcano roll, and possibly Devil’s roll.

3) Peruvian – Ceviche, Choros, Choclo, Papa a la Huancaina, Tallarines verdes, Lomo saltado, Anticuchos, Arroz con Pollo, Canchita, Pisco Sour, and more!

4) Thai – Tum Yum soup, Pad Thai noodles, Rat Na Noodles, Spicy thai chiles.

5) Indian – Naan Bread, Chapatis, Chicken Tikka Masala, Chicken Tandoori, Chicken Curry, Chicken Vindaloo, Raita, Etc….

So these are just a few of the dishes that I can name off the top of my head. But then came the curiosity of knowing what is in your top 5??!! I am curious so post and lets see which one is the most popular.

Advertisement

Pasta and Fagioli my way

In Italy Pasta e Fagioli which means ‘Pasta and Beans’ is a signature and typical winter soup. The orginal region from which it comes from is still not certain but there are a few places that we think this delicious soup was born: Lazio, Campagnia, Lombardia, Toscana and Veneto.

However, growing up I could never wait for a cold day so that I could eat this soup. My brother James was the best at making this soup, it always seemed to taste delicious and warm. I can never get enough of this soup! The ingredients vary from region to region, home to home, person to person. The way my family and I make it always seemed to taste the best to me. In this recipe I use Kamut short pasta it tastes delicious and much healthier this way. I also cook my pasta separately and not with the soup because I feel as though pasta tends to expand even after the cooking time is over and then absorbs all the liquid.

I hope that you can enjoy this soup as much as us Italians do. Have a warm and happy day. Enjoy!

Ingredients

Time : about an hour

1 onion

1 carrot

1 celery stock

2 bullions*

200 gr. Pancetta diced*

1 14oz can tomato sauce

4 14oz cans Barlotti beans*

5 cups of water

400 gr. Kamut ditalini*

3 tbsp. Olive oil

Salt to taste

Parmesan (grated)

In about a 4 qt. pot boil water for the pasta over medium flame.

Chop up your celery, carrot and onion very finely. In a 5.5 qt. pot over medium heat add the olive oil. Once the oil is hot add your carrot, celery and pancetta and let sauté for 3-5 minutes, at this point you may add the onions and continue to sauté until onions are translucent. Add the bullion and let dissolve. You may add your tomato sauce and beans stir and add 5 cups of water. Cover and bring to a boil, but continue mixing. Add salt and set to low flame.

Once the water for the pasta starts boiling, throw in your pasta and cook 8 – 10 minutes. Or whatever time it says on the box as cooking time may vary. Drain pasta and return to pot. Add a splash of oil so it won’t stick and stir.

Turn off heat for soup. Now put one spoon of pasta in bowl and cover with bean soup. Add Parmesan on top and serve.

* Make sure that the bullions are MSG free, and try to get more natural possible.

* Pancetta is Italian bacon, you can find it in the deli section, just ask them to cut you a chunk that weighs a quarter of a lb or 7oz. and then slice it yourself at home into cubes.

* Barlotti Beans may be hard to find in the USA, I used to use Cannelini beans, but you could try Pinto, Kidney, or even Garbanzo beans.

* I use Kamut pasta most easily found in your neighborhood Health store, or Whole foods. However normal pasta is perfect also. Or if you’re gluten intolerant use Gluten free pasta, you can literally use whatever you like.

About Cayenne Pepper

What is Cayenne:

Cayenne pepper is one of the most popular spices used throughout the globe. The scientific name: Capsicum annuum var annuum. It comes from the Capsicum family of chiles and is native to Central America. If you were to calculate the “Scoville heat units” of cayenne it would be around 30,000 to 50,000. The hotness produced by cayenne is caused by its high concentration in a substance called capsaicin. Technically referred to as 8-methyul-N-vanillyl-6-nonenamide. It’s hot even used in small amounts but provides an array of benefits to the human body.

Health Benefits:

Over 80 units can be found in the health benefit chart for this chili pepper. The reported health benefits of cayenne are almost too unbelieveable, but its reputation keeps growing among medical researchers as well as alternative health afficionados. Let’s get into some of the specifics of cayenne pepper benefits: It has been known to increase metabolism, fight inflammation, clear congestion, natural pain reliever, cardiovascular benefits, boost immunity, prevent stomach ulcers, lose weight, relieves muscle pains, it can kill cancer cells in the prostate, lungs, and pancreas to immediately stop a heart attack within 30 seconds, etc…

It is rich in vitamins and minerals. From Vitamin A, B1, B6, C, D, E, K, Beta Carotene, Beta Cryptoxanthin, Leutin+Xeaxanthin, Beta Tocopherol, Gamma Tocopherol,Delta Tocopherol, Folate, Niacin, Choline, Betaine.

To the Minerals; Calcium, Iron, Magnesium, Manganese, Phosphorus, Potassium, Sodium, Zinc, Selenium, Fluoride.

How to Use:

Cayenne, chopped and grounded, used as condiment in the preparation of pepper sauce, soups, curries and to marinate meat, fish and poultry.

I love spice so I put it in any dish I eat. I would suggest you try it before you add it to any food. I love the whole foods brand 365 because it is spicy, but any brand should be fine. My husband likes it a little milder so he generally buys Crystal hot sauce as it is made with Cayenne.

Cayenne chilies either fresh or powdered form, can cause severe burning sensation to hands and may cause severe irritation to mouth/nasal passages, eyes and throat. Therefore, it may be advised in some sensitive individuals to use thin hand gloves and face masks while handling.

Again I am not a doctor or nutritionist, so please do your own research or consult a professional before using Cayenne in any medical manner. I hope that you enjoyed this and happy Spicy cooking.

Below I included some helpful websites that talk about Cayenne.

http://lifestyle.iloveindia.com/lounge/nutritional-value-of-cayenne-pepper-6028.html

http://www.whfoods.com/genpage.php?tname=nutrientprofile&dbid=71

http://www.cayennepepper.info/health-benefits-of-cayenne-pepper.html

http://www.nutrition-and-you.com/cayenne-pepper.html

Sesame Soy Green Beans and Edamame with Steamed Sea Bass

Have you ever opened your fridge and tried to figure out what you are going to make for dinner? Well that is what happened last night when I was so busy working that when dinnertime came around I had no idea what I would be making. So I opened the fridge and saw that I had sea bass but no vegetable. Now I always keep either frozen spinach or frozen green beans in the freezer if ever an occasion arises that I don’t have fresh vegetables or didn’t have time to make a run to the grocery store but want vegetables (they’re served at every meal). So I opened the freezer and ‘Yes’, I had green beans and also shelled edamame. That is when I decided I would serve green beans and steamed sea bass for dinner. This only took about 15 minutes to make. It turned out delicious and was healthy as well.

I used the grill to steam the Sea bass but you can use the oven as well, preheat oven at 250 degrees and steam fish for 10 – 15 minutes depending on thickness, what you want is for it to be flaky.

Serves 2

Ingredients:

1/2 lb. Sea Bass

1/2 lb. frozen Green Beans*

1 cup. frozen shelled Edamame

1 tbsp. Sesame seeds

4 tbsp. Olive oil

2 1/2 tbsp. Soy sauce (Low sodium)

Salt and pepper to taste

Sheet of aluminum foil

Pour 2 1/2 tbsp. of Olive oil in a large sauté pan over medium heat, add the sesame seeds and let toast lightly, do not allow to burn. once that’s done you may add Green beans and Edamame, now cover.

In the meantime get the foil and get enough to wrap your Sea bass, out the sea bass in the foil and pour remainder Olive oil and add salt and pepper. Cover the fish and put on the grill for about 10 minutes.

Go back to your green beans and edamame and pour your soy sauce over and stir. Cook for another 6 minutes and remove from flame. You should be able to bite through both your Edamame and Green beans.

Remove the Sea bass form the grill and serve along with Green beans and Edamame. Enjoy!

* you may of course use fresh Green beans, I think fresh is always better, but if you find yourself in pickle frozen works just fine.  Just remember that the cooking time will vary.


Shrimp, Artichoke Green Salad

I love shrimp. I literally could eat shrimp everyday. The thing about shrimp is that it’s really easy to make and you don’t have to put too much on it to make it taste good, I either steam, boil or grill it. Shrimp is an excellent source of protein. Shrimp also provides omega-3 fatty acids that help reduce the risks of heart disease by reducing triglyceride levels in the bloodstream. Shrimp also contains selenium, essential for proper thyroid and immune system function. So for me it’s considered healthy and delicious; which is what I am all about. This is a quick, easy and healthy recipe that you can make when you are in hurry and don’t have time to cook but want to get a nutritional and low calorie value out of your meal. I always have these ingredients in my house for when I want to whip up a salad or healthy meal. You should too!

Serves 4

Ingredients:

1 lb Shrimp (deveined)*

1  14oz can quartered artichokes (in water)

1 bag salad Italian mix (or whatever you prefer)

1 bag salad Baby greens mix

6 grape tomatoes (washed and sliced in half)

5 tbsp Extra Virgin Olive oil

Juice of 1 lemon (freshly Squeezed)

Salt and Pepper to taste


Put your shrimp in a medium stove top pot fill with water until shrimp are covered and put over heat to boil. Your shrimp are ready once they turn pink, should only take 5-8 min. While shrimp are boiling, drain your artichokes and rinse.

In a medium salad bowl pour your salad and tomatoes and now you may incorporate your artichoke. Your shrimp should be ready by now so drain and run under cold water just enough to stop steam. Make sure all water is drained and let sit. In meantime squeeze your lemon and mix in with olive oil, salt and pepper in a small mixing bowl. Add the shrimp to the salad and pour your dressing into the salad bowl and mix until all the salad is incorporated with the dressing. Now serve

* if you want you can have already cooked shrimp also. Just make sure that you rinse and remove tails.


My Exceptional Lasagna

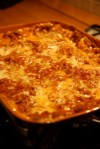
Now this is a recipe was brought to life when I was young, I liked to make Lasagna but I didn’t understand the reason why it always seemed like such a hassle and so complicated. I watched my Mom, my Grandma, Aunts, Friends, Cooking shows, and read tons of recipes; and what I found that all had in common were: Ragù (tomato and meat sauce), Besciamella (Beshamel), Mozzarella and Lasagna. Now in this recipe I make a lot of shortcuts, but the outcome is amazing. I serve this dish just about anytime I have house guests, when I go to visit my in-laws; etc… people just seem to love it! My husband loves it, and I love it. So why not share it with you. I hope that you enjoy this meal, and remember you don’t have to wait for a special occasion to make this dish, now you can make it whenever you want. In this recipe I use spinach lasagna, but the regular ones are fine also, what I do think is important is that I use the no-boil lasagna; generally ‘Barilla’ is the brand I have used since the first time I made Lasagna.

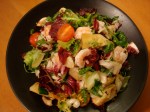
This dish is complete. If there is something you want to serve before as an appetizer I suggest a nice crudités of vegetables, or a small salad. I would say to always serve something light, you don’t want people to be stuffed before they even eat the lasagna, and then this way you also have all the food groups in one meal; protein, carbs and veggies. If you want to serve dessert, I suggest a nice sorbet or a light and fluffy Tiramisu, a chocolate  soufflé or something that is going to help the digestive system.

Remember this is a delicious way to indulge in lasagna, it’s not heavy as the ones that I have seen made while living in the States, it’s more traditional to what you will find here in Italy, mainly the North where lasagna originally comes from.

Please enjoy!


Ingredients:

Serves 6

For the Ragù:

1 medium onion (peeled)

3 tbsp Olive oil

1/2 lb. Ground beef

1/2 lb. Ground pork

1 bullion

1/4 cup red wine

25 oz. tomato sauce

salt to taste

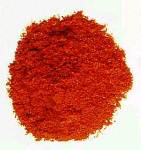
red chili flakes (optional)

For the Besciamella:

1/4 cup butter or margarine

1/2 cup white flour

1 cup of milk (I use non-fat)

1/2 cup of water

salt and pepper to taste

Remaining ingredients:

1 lb. mozzarella

1/2 cup parmiggiano

500 gr. spinach lasagna*

Start off by making your Ragù, first heat the olive oil in a medium pot or large saucepan, then add your onion cut in half, the onion serves just to give the aroma you will remove it later this is why I don’t chop it. After the onion starts to turn soft add the ground meats, cook until brown at which point you will add the bullion, once you bullion has dissolved add the wine and let simmer for about 8 minutes. You may now add the tomato sauce and your salt and red pepper flakes. Put at a low flame and let simmer, stirring occasionally.
Now you may cut your mozzarella in small cubes, or you can grate it. Once this is done, preheat your oven to about 350 degrees and lets start our besciamella.

Get a 2 qt pot, put over medium flame and melt your butter, when butter is melted remove from heat and add your flour (it should turn into a thick ball), Gradually add the milk, whisking constantly to prevent any lumps from forming, when you have added milk add your water, salt and pepper to taste. It will be very liquid return to low flame and stir constantly, about 8 – 10 minutes. It will start to thicken up slowly, stirring constantly will help it not burn or get lumps. The sauce should be thick enough to coat the back of wooden spoon. Remove from heat and allow to sit for 10 minutes.

You may turn off you Ragù and remove onion.

In a 13 by 9-inch baking dish, spread some of the ragù sauce, arrange pasta sheets side by side until the bottom of the pan is fully covered. Evenly spread a layer of your besciamella sauce, and a layer of the mozzarella. Arrange another layer of pasta sheets and spread a layer of the ragù sauce. Arrange another layer of the pasta sheets and add another layer of besciamella sauce, and then a layer of the mozzarella. Arrange another layer of the pasta sheets and spread another layer of the ragù sauce, add all the parmiggiano evenly over the Ragù. (you may add another layer depending on how deep your pan is, or you can leave it like this just remember the final layer has to be Ragù and Parmiggiano.)

Place the lasagna in the middle rack of the oven and bake for 20 minutes to 30 minutes, until top is bubbling. Remove from oven and let sit for about 15 minutes. You may serve.

Buon Appetito.


* if using regular lasagna follow cooking instructions on the box. What I generally do is place aluminium foil on top of baking pan place in oven for about 30 minutes, until top is bubbling. Then I remove foil and continue to cook for 15 minutes. Just make sure to read the instructions on the box to avoid over cooking or under cooking. Cooking time may vary just because I’m in Italy, although it should be around the same.


Grilled Chicken and Quinoa

This is my Husbands favorite dish; we make it at least once every other week. This is great served with my green bean and cherry tomato recipe, or grilled asparagus, or any vegetable of choice. Just make sure that you serve a nice vegetable with it so you get all the food groups in one meal. I especially love to cook with Quinoa, it’s not only a great substitute for carbs but it’s also a great source of iron and has lots of good vitamins. I also like grilling a lot because it adds amazing taste to the food without a lot of sauces, or fats on it. It keeps the food light and healthy. Please enjoy, and I hope this becomes a signature dish in your house as well.

Serves 2

Ingredients:

1 cup Quinoa

1 3/4 cups water

½ Bullion cube

2 Chicken breasts

4 tsp. Olive oil

Salt and pepper (to taste)

Chili Flakes (optional)

Place the Quinoa and the water in a small saucepan; add 2 tsps. of olive oil and the bullion with a dash of salt and pepper. Allow to boil and then turn heat down to minimum and let the Quinoa absorb the water for about 15 minutes, (time may vary so be sure to check).

Heat your grill and in the meantime you may marinate your chicken breasts with the remaining 2 tsps. of olive oil, salt and pepper. Put on the grill and cook through (just remember that depending on how thick your breasts are cooking time may vary), normally I’d say about 10 minutes on each side.

If your Quinoa is cooked turn off and let sit until chicken is ready.

Now you may begin plating, put Quinoa in a small bowl or ramekin and push until leveled, flip upside down on plate and quinoa should have remained nicely on the plate put the chicken breast on the side and serve.

In the pictures below I served sauteed zucchini with the chicken and quinoa. But you can serve it with any vegetable of choice, spinach, green beans, asparagus, eggplant, broccoli, cauliflower, a salad, tomatoes, corn and so on whatever you like.

Quinoa Nutrition facts

What is Quinoa?

Quinoa is known as a superfood, some people relate it to grain but it is actually a seed that comes from a plant most closely related to spinach. It is grown in the Andes mountains of South America.  The ancient Incas considered this plant sacred and called it “chisaya mama” which means ‘Mother of All Grains’. Quinoa grains are about the same size as millet, but flattened, with a pointed, oval shape. The color ranges from pale yellow through red and brown to black.


These are the Nutrition facts and why it’s so good for you:

Quinoa is a great source of iron, manganese, potassium, riboflavin, copper, phosphorous, tryptophan, B6, niacin and thiamine.  One cup of cooked quinoa has only 220 calories.  It also has 5 grams of fiber and 8 grams of protein.

Quinoa is stocked with life-sustaining nutrients all across the board, including all eight essential amino acids. There are other highly beneficial compounds, vitamins and minerals.

It is not surprising that it is being recommended for people who want to lose weight, for people who suffer from migraine, heart disease and atherosclerosis, for people with gluten sensitivity, for vegans, and basically for everyone who wants to eat healthy.


How to Prepare:

Quinoa cooks very easily, in about 15 minutes. Like cooking rice in a stove top pot, you’ll want almost 2 cups of water per one part quinoa but be careful not to pour too much water in the pot, otherwise it will take even longer.

Cook quinoa at a high setting until it starts boiling and then cover and simmer for about 12-15 minutes. When you see the ring-shaped sprouts popping out, you’ll know the quinoa is almost ready. Stir the quinoa so all the water gets absorbed.

Quinoa by itself is rather bland, I like to add olive oil, bullion, and if you like spicy food as I do some chili pepper as it boils. Quinoa is fun to cook with and you can add anything you like to it, from veggies to poultry, or you could make it as a cereal with milk and cinnamon, you can incorporate it into dessert, it’s a chameleon.

I hope that this was helpful for more information I added below some of the sites I pulled this off of. Enjoy!

http://www.mnn.com/food/healthy-eating/stories/quinoanutritionfacts

www.quinoanutritionfacts.com/

nutritiondata.self.com/facts/cereal-grains-and-pasta/10352/2


Green Bean and Cherry Tomato Salad

This is something that is extremely easy and fast to prepare. It’s great served as a main dish or a side dish to fish, poultry or meat. It’s low-fat and healthy. What I love about this salad are the colors they compliment just about any dish and help make it look elegant.


Ingredients:

Serves 2 (if used as side dish serves 4)


1 lb Green Beans *

6 Cherry tomatoes

Handful of Arugula (Rocquet)

Handful Baby greens

Fresh spicy cherry peppers (optional)

4 tbsp. Olive oil

2 tbsp. Balsamic vinegar

Salt and Pepper (to taste)


In a medium pot fill with water at about ½ way add salt and boil. Once your water has started boiling add the green beans that you have previously cleaned and let boil for 8 – 10 minutes. Strain green beans and let cool.

In a salad bowl add your arugula and baby greens. Slice the cherry tomatoes in half and add to bowl. Slice your cherry peppers in ¼ slices and add to bowl as well. Now you may add the green beans to the bowl along with the olive oil, vinegar, salt and pepper. Mix all ingredients well and serve.


* If you don’t have fresh green beans you may substitute for frozen ones just remember that cooking time may vary.

Blueberry and Honey Yogurt Pie

This is a delicious recipe that I actually found in an addition of a food and wine magazine. I tweaked it a little, but the outcome is amazing and I feel was delicious. Perfect as a snack or dessert. Exceptionally great with a spiced themed dinner, Greek, Indian or Middle-Eastern, it’s the cooling sensation that the yogurt along with the ginger leave.

Ingredients:

12 whole graham crackers

5 pieces crystallized ginger (finely chopped)

4 tablespoons butter (melted)

1 1/2 tablespoons sugar

smidgen of salt

1 egg white

2 cups of non-fat greek yogurt (drained overnight)

2 tablespoons of honey

1 1/2 – 2 cups of fresh blueberries

Preheat the oven to 350 degrees. Spray a circle  pie pan 9 x 9 and set aside. In the food processor, pulse the graham crackers with the sugar, salt and crystallized ginger until finely ground. Add egg white and butter and pulse until mixed well. Pour the crumbs into your prepared pan and press evenly over the bottom and the sides of the pan. Bake for 20 minutes, until the crust is lightly brown. Let the crust cool.

In a bowl mix the drained yogurt and honey. Pour the yogurt evenly over the crust and arrange the blueberries evenly over the top of the yogurt. Now you can slice and serve.