Skinny Italians Eat Pasta: Simple and Delicious 5-Ingredient Spaghetti Dish

I do like Spaghetti. But it is also one of those foods that if you are not careful can be really fattening. Its not the fact that pasta in itself is fattening, it’s the ingredients that we chose to dress the pasta with that often times makes the dish fattening. You are already eating carbs so I always say dress it light. Here in Italy most Pasta dishes are dressed really simple and with few ingredients, I think that this is the secret as to why Italians are really all so thin even though they eat pasta pretty much everyday. This is the secret: Always use fresh and natural ingredients, dress lightly and most of all don’t overcook.

Overcooked pasta sends blood sugar higher than pasta cooked al dente. Italians believe that overcooked pasta is harder on your digestive tract than al dente which is easier for your body to digest and doesn’t leave you feeling sluggish. When pasta is overcooked, it means it has absorbed its maximum amount of liquid. Pasta cooked al dente, on the other hand, can still absorb more during the digestive process and therefore digests more easily.

Pasta al dente also has a lower glycemic index than overcooked pasta, so it has less of an impact on your blood sugar levels. The Pasta Italians eat that are high-quality pastas made of hard durum wheat semolina and whole grain pastas have staying power. Their low glycemic indexes mean that they give you a slow, steady supply of fuel while allowing your blood sugar levels to stay constant, which helps protect you from getting hungry between meals. With all this said you should still have portion control (about 100gr. per serving), don’t have a huge plate and always try to accompany with either protein of veggies.

Oh, and please don’t ever rinse your pasta when you drain, unless you are serving a cold pasta salad. If you went over the cooking time you may throw in a cup of cold water in the pot to stop the boiling and cooking process of the pasta.

Ingredients:

250 gr. Spaghetti N° *

8 oz can of Natural Tomato Sauce

1 Garlic clove

A few leaves of basil

Drizzle of Olive oil

Salt to taste

(chilies optional)

Grated Parmigiano Reggiano

Place a pot of salted water to boil. In a medium sauce pan drizzle some olive oil, allow to heat and then add your garlic clove peeled but whole (you just want the oil to pickup the aroma), allow garlic to turn slightly golden and then remove from pan, add your can of tomato sauce now cover and allow to simmer.

By now your water should be boiling throw in your Spaghetti and allow to cook for about 8 minutes stirring occasionally. (Always follow cooking instructions on the box).

Throw in you basil leaves and add salt to taste in you tomato sauce. (Chilies as well if using.)

Drain your spaghetti and either join in together in the sauce pan and mix with all the sauce or you can put back in the pot add a few ladles of sauce and stir. Serve and add some sauce on top and sprinkle parmigiano on top.

Enjoy

* You can use any type of Pasta you have

Advertisement

What’s more Healthy than: Quinoa Primavera

So as you know I love Meatless Mondays and an All Vegetarian meal whenever I can….??!!

I especially love Quinoa, for me it’s the best substitution to heavy carbs and it marries so well with vegetables (really anything, in this case I am focusing on vegetables 😉 ), I love the fact that it really will just blend with whatever flavors it is paired up with.

It’s been winters and although I love salads it’s been pretty hard to just have a salad when outside it’s snowing or just plain cold. So, what I resort to is basically roasted, steamed or lightly sauteed vegetables. On this particular day I hadn’t gone to the store in a while it was snowing outside and I just was going to use whatever I had in the fridge. I always have a large variety of veggies so I figured that I would make vegetables accompanied by……??? I opened the cupboard and there was the Quinoa, so I decided I would make something using both. I seldom will serve my Husband just vegetables, unless requested by him. Even if I just eat all vegetarian I always try to make him, chicken, beans or pasta or something (healthy) to go along with the veggies. So in this case it was Quinoa.

I do have a post I completely dedicated to the Nutrition facts and health benefits for Quinoa, you can see here: http://mythineats.com/2011/11/11/quinoa-nutrition-facts/

However this dish is simple, light, healthy, low carb, and low fat. So I hope that you like it. You can serve as a main dish or as a side dish to chicken, salmon, meat, eggs; whatever you like or prefer. Enjoy

Ingredients:

Serves 2 as main dish 4 as side dish

1 cup Quinoa

2 cups of Water

1/2 cup frozen Peas

2 Zucchini

1 Endive

A couple leaves of Radicchio

A handful of Arugola, washed

Salt and Pepper to taste

A few drizzles of Olive oil

Preheat your oven at 180° C (350° F).

Now put the quinoa and the water in a small pot, add a drizzle of olive oil and some salt and pepper to taste, mix, cover and place over medium heat. Bring to a boil and lower flame to minimum and allow to simmer for about 15 minutes (until all water is absorbed).

Get your slice in 1/4 in rounds and place on a baking paper over a big baking tray or cookie sheet tray, lay them out one by one. Do the same with the endive. You should be able to fit your leaves of radicchio also, drizzle some olive oil over the vegetables and add salt and pepper to taste. Put in oven and allow to bake for about 15 – 20 minutes.

Place about 1 cup of salted water to boil in a little sauce pan, once boiled throw in the peas and allow to cook for about 5-8 minutes. Drain immediately in cold water and set to the side

Fluff your Quinoa, join all ingredients in a salad bowl and mix lightly and if you like you can squeeze a little bit of lemon over it and serve.

I have included a photo with an fried egg on top, or you could also chop up some feta or any cheese you like and throw it in. There are so many endless variations. Enjoy!!!


Foods that Burn Body Fat

Well, before we get into it and I want to say that the list of foods below are there to help you make smarter decisions when ordering or cooking foods and will help you when working out and tying to eliminate the layer of fat that is covering your muscles.

So how do you pick the best foods that burn body fat? Easy. Look for foods that are considered thermogenic. Calorie for calorie, certain foods are considered to increase your metabolic rate – that is, they naturally increase energy expenditure – helping you burn body fat rather than storing it.  In reality, ALL foods are “thermogenic” because the body must use energy to digest them. This is known as the “thermic effect of food” (TEF) or “specific dynamic action of food.”

And when that occurs, your body taps into existing fat stores to meet energy demands, melting off the layer of fat covering up your six pack that you’ve been dying to show off. Even better, some foods have abilities to surpass their fat-burning effect. Certain choices result in fullness; some require energy to be broken down; and some can even release body fat elevating your metabolism.

A lot of people try to starve their nutrition in a bid to reduce fat. This approach can have spurious effects on the harmony of the body and is not a wise or healthy way to reduce fat. The right way to reduce fats would be to eat foods that reduce the possibility of further fat deposition, or foods that assist in burning fats, while also taking up calorie-burning exercises (like aerobics, yoga and resistance/weight training) to use up the past-stored fat in your body. The science is complicated and not necessary to grasp.  You need to understand which foods work to promote fat burning so you can capitalize on the best options and get rid of your unwanted fat. However, not all foods have the same thermic effect. Dietary fat has the lowest thermic effect. The most thermogenic food is lean protein from solid foods.

Question: What are the best fat burning foods, that help eliminate body fat?

Oats:   Oatmeal will help you reduce fat levels by providing sustainable energy and keeping you full so you don’t over eat mid morning. It’s full of plenty of fiber to maintain your insulin levels throughout the day.

A key to losing fat is to keep insulin levels lowered because insulin moves fat into storage more easily, especially if you’re not weight training regularly. Raisin and Barn cereal is another good example of breakfast food that’s rich in insoluble fiber, so is cooked barley.

Eggs:   A study showed that those who ate eggs for breakfast instead of bagels lost considerably more fat.  Not to mention the muscle-building power of the protein found in eggs because of it’s superior amino acid profile.  The fat in the yolk of the egg is the healthiest part and helps with slower digestion and reduces hunger therefore one of the best foods that burn body fat when eaten in moderation.

Poultry:   Poultry like chicken are low on fats and carbohydrates while have a good protein profile. Research has proven that the thermic effect of protein is the highest of all the macronutrients, requiring about 30% of the calories it contains, just for digestion and processing. An added bonus is that lean protein foods suppress your appetite! Try to incorporate the following lean proteins as well: Turkey breasts, Bison, Venison, Buffalo, very lean Red Meats like (top round and lean sirloin, as well as lean veal), just about any type of Fish, Shellfish and other Seafood.

Almonds and Walnuts:   These nuts are a great source of healthy fats. It has been seen that people who don’t consume healthy fats are more likely to gain weight than people who do. This is the reason why it’s very imprudent to eliminate healthy fats from your diet in a bid to reduce weight. Remember that healthy fats are needed for a harmonious functioning of the body because most of the body’s cell structure is made from these fats.

Olive Oil:   Your body cannot live without certain foods and “good fat” is one of them. That’s because approximately 70% of it Olive oil is one of those “good fat.” Olive oil is rich in monounsaturated fat, a type of fat that has many healthy benefits like preventing heart disease, colon cancer and controlling LDL (bad cholesterol). It’s also loaded with vitamin E and antioxidants.  Olive oil can increase the activity of certain chemicals called “uncoupling proteins.” These chemicals effectively “tell” the body to burn excess calories, rather than store it. Oil is one of the forgotten foods that burn body fat.

Water:   Though water would not count as a food, because it has no calories, it would need to mentioned that water helps improve the over-all metabolism of the body and thus helps burn fat. And of course, water helps flush out toxins and thus improves the capacity of the body to stay healthy. Certain foods are rich in their water content and thus help in the process of fat reduction. Regardless, keep cold water in your thermogenic food plan and rely on water’s other advantages: It keeps you hydrated, which assists with energy, absorption, being anabolic and is required to burn fat.  Staying hydrated can also help you keep your overall calories lower.

A Simple 3-Step Formula To Put Together A Fat-Burning Meal:

STEP 1: Select a green vegetable or fibrous vegetable such as asparagus, green beans, broccoli, brussel sprouts, cauliflower, salad vegetables, etc., and then

STEP 2: Combine that with one of the lean proteins (previously mentioned above).

STEP 3: The lean protein and fibrous carb forms the foundation of your fat burning meal. From there, add natural starchy carbs or grains such as brown rice, oats, or sweet potatoes – in the amount your calorie needs dictate and to the degree your body can tolerate them (some people have a carb-intolerant body type). Fruit is also ok, but focus even more on the green and fibrous vegetables.

I hope that you enjoyed this research I did. It’s a great and healthy way to eat everyday regardless! Remember I’m not a doctor or dietician, just a girl that is interested in how to get the Maximum benefits out of food and have a healthy physique.


Here are some of the websites I pulled this information off of:

http://www.burnthefat.com/fat_burning_foods.html

http://www.home-workout-success.com/foods-that-burn-body-fat.html

http://www.iamnotobese.com/fat-burning-food-list.php


Something YUM!!…My twist on Shepard’s Pie, you’ll love it!

I had Shepard’s Pie a couple of times while growing up, as a child it’s a delicious dish….meat, mashed potatoes and a lot of cheese. Growing up I don’t think I ever ate it but I have often thought back on the times that as a child I did like it whenever it was made. However fond I was of it I couldn’t bring myself to make it, I would think about it but then a better recipe would come to mind or something healthier or just something else.

So, as you know it’s winter time and it’s cold, and in times like this one might think of lots of comfort food and in those thoughts there might be Shepard’s Pie. Well, I decided that I would make it with an Italian twist. Off to the store I went and I decided that I would put Mozzarella in it, and that I would not mash the Potatoes but keep them whole and sliced, then all of a sudden I got the brilliant idea that I would go ahead and make it kinda like a Eggplant Parmigiana or Lasagna, but maintaining the English ingredients minus the mozzarella. My Husband wasn’t fond of the thought of Shepard’s Pie; but I am lucky that he trusts me and will try new things. So, with him on board and my mind set to surprise him I made the following meal and it was delicious. It filled us up to perfection, we didn’t feel heavy and it turned out to actually be a healthier version and lighter as well.

So, here is the recipe and I hope that you enjoy it! It’s especially perfect for this whether.

Ingredients:

5  medium Potatoes

1 large Eggplant

1 lb Ground Chuck*

1/2 lb Mozzarella

Salt and Pepper

Olive oil

Slice your potatoes a little thicker than 1/4 inch thick. Place in a medium sized pot covered with salt water and allow to boil for about 10 – 15 minutes, do not allow to cook completely, just under cooked is perfect, drain and set aside.

Meanwhile, slice your eggplant in 1/4 inch rounds and place in a skillet with a drizzle of olive oil and a sprinkle of salt and allow to get golden on both sides, once you are done cooking all of the eggplant set aside.

At this point you may turn on your oven to 350° F (180° C).

Put your ground chuck in a skillet with a drizzle of olive oil and allow to brown completely, add some salt and pepper, turn off once meat is cooked. Slice you Mozzarella really thin and set aside.

Grab you baking dish, drizzle just a bit of olive oil on the bottom and start layering all ingredients. Start first with a even layer of the meat, a layer of eggplant, then add a layer of potatoes add a sprinkle of salt and some pepper and then layer mozzarella, a layer of meat, a layer of eggplant, a layer of mozzarella, a layer of potatoes, continue until all is finished you want the potatoes to be the last layer at the top, then sprinkle a dash of salt and finish off with pepper. Bake in the oven for about 20 – 30 minutes.

Allow to sit for 10 – 15 minutes and serve.

* You may replace ground chuck for ground turkey or even chicken.


Get your Omega-3 with this amazing Pasta dish

Here in Italy it’s very common to use canned Tuna, it usually is in Olive Oil it renders the tuna more tasty and tender. You can always find either a salad or pasta dish with tuna. It’s quite delicious and healthy. This is a recipe that I developed a while back, I think I was about 18 I lived alone and I used to make it especially in the summer because it was light and easy to make. My friends would come over and we used to sit around and eat this and then get on with our day. They used to say that they loved this dish just as much as I did.

Everyone here in Italy has a version of this dish and they make it however they like, some add tomato sauce, some forfeit the olives, some add capers, and some just get the can and throw it on top of the cooked pasta without anything else; so as you can see it’s really optional and you can do however you like. I like it this version but in general I think that this dish is a fantastic way to eat something nutritional and light. Omega-3’s are very important in our diet and this is a simple way of getting them. I hope that you enjoy this dish and remember let’s be creative. I love spicy foods, so as you’ve probably noticed just about now there is always something spicy in my dishes, feel free to leave that out, it will taste just as good…that is one thing that I can’t seem to give up: my capsaicin. I love it!

Enjoy


Serves 2 – 3

Ingredients:

250 gr. Mezzemaniche*

2 cans Light Tuna (in Olive oil if possible), drained

6 Cherry tomatoes

5-6 Black olives (sliced)

½ Garlic clove

Chilies (optional)

Handful Parsley (chopped)

Olive oil

Salt to taste


Place a medium-sized pot of salted water to boil.

In a separate small pot put some water to boil, toss in your cherry tomatoes and allow to boil for about 2-3 minutes, just enough to get the sherry tomato skin off, drain and start to peel. Place on a cutting board and slice in half, over your kitchen sink squirt out the seeds and place the tomatoes aside.

In a pan over medium heat pour in some olive oil, just enough to cover the bottom of the pan, put your garlic (do not slice, you just want the aroma); allow 2 minutes to go by and join the tomatoes, allow to simmer for about 5 minutes and then add the rest of your ingredients, tuna, olives, chilies, parsley and salt; allow to cook at low heat for about another 5 minutes and then turn off heat and allow to rest.

In the meantime your pot of water should be boiling, throw in your pasta and cook for the time mentioned on the box generally 9 -11 minutes, drain and join with your tuna sauce, mix well and serve.

* I like Mezzemaniche, they are larger than Ditalini but you can use any pasta you like.


Healthy Eating: How I spent my Valentines day!

Sorry I didn’t post anything yesterday but I was kept busy doing some special things for my Husband.
This is the first Valentine’s Day in Italy and also the very first we weren’t able to celebrate with a little wine or bubbly (or should I say I couldn’t drink)…. I take my responsibilities seriously and “the little Buddha” growing inside my belly was far more important than drinking, (although I really would’ve enjoyed it).

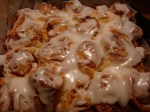
My Husband has been asking for pancakes for a few weeks now and I finally decided that when Valentine’s day came along I would wake up and make some pancakes for him, I am trying to still eat healthy throughout this pregnancy so  decided that I would go ahead and make healthy whole wheat pancakes. I did some research online of course to make sure that I had the right ingredients and also to see what recipes stuck out to me, I have to say that not one in particular did stick out to me, some called for buttermilk, others called for butter, some had a mixture of regular white flour and whole wheat flour so I decided that I would make them my way. They came out delicious and fluffy, that was my biggest fear being that they would be whole wheat I was afraid of them being heavy and not so exciting to eat. Well they came out fantastic….and the cappuccino along side was perfect!

You’ll need:

1 2/3 cup Whole-wheat flour

2 tbsp. Sugar

1 1/2 tbsp baking powder

1/2 tsp. Cinnamon

1/2 tsp. Vanilla extract

1/2 tsp. Salt

2 Eggs, separated

2 cups Lactose free low-fat Milk

In a bowl large bowl combine flour, sugar, baking powder, cinnamon and salt. In a separate bowl beat your egg whites with a mixer or whisk until stiff peaks. In a separate bowl beat milk, yolks and vanilla until foamy.

Add milk mixture to the flour and stir, (it’s ok if a little lumpy) fold in your egg whites and stir until evenly colored. Heat your griddle or pan and add very little vegetable oil to the bottom and distribute evenly with a paper towel, once the pan is hot pour in your batter. Allow top of pancake to bubble and then flip and cook for another 2 minutes.You may serve with whatever you like. We served ours with strawberries and maple syrup. Enjoy.

After a delicious and healthy breakfast we both went off to run errands, work ..the usual. For dinner we decided that we would cook together so we started. My husband has been getting more and more into cooking as the years go by and likes to help out whenever he can and possibly learn a couple of things, which I am happy about because it’s nice to be cooked for once in a while. We both decided that we wanted a light and fish based meal, it ended up being 3 courses but extremely fast and easy. For the “antipasto” (starter) we decided to have “Gamberi con rucola e grana” which is very common to eat here and simple; it translates “Shrimp with arugola / rocquet and parmigiano”.


You’ll need:

200 gr. Peeled and deveined Shrimp

1 handful Arugola / Rocquet

A few Parmigiano flakes

2 tbsp olive oil

Salt and pepper to taste

Boil your shrimp. In the meantime wash your arugola/rocquet and set aside. Grab your Parmigiano and make your flakes with a knife (just enough to put on top of dish). Drain your shrimp (remember shrimp cook fast, once they turn pink they are pretty much ready).

Lay arugola/rocquet at bottom of plate, add your shrimp and drizzle 1 tbsp. of olive oil and salt to taste. Now you may add your flakes of Parmigiano and enjoy! If you like you may drizzle a bit of Balsamic vinegar over top.

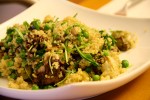
For the “primo piatto” which means “first course”, we had “Ravioli a forma di Cuore, riepieni di Ricotta e Spinaci, in salsa di Asparagi e Salvia” handmade (bought though) heart-shaped ravioli filled with ricotta and spinach, with an asparagus and sage sauce.


You’ll need:

250 gr. Ravioli filled with Spinach and ricotta

1 cup of sliced Asparagus stems

1 – 2 sprigs fresh Sage

3 tbsp. Olive oil

1/2 tsp. Margarine

a few of Parmigiano Reggiano flakes

Red pepper flakes (optional)

Salt to taste

Put a pot of salted water to boil. Meanwhile grab your asparagus, chop the stems off and then slice them into 1/4 inch thick. In a medium saucepan place the olive oil, once heated add your asparagus and allow to cook at medium flame for about 5 minutes, now lower heat and add your sage leaves, red pepper flakes and salt and allow to cook for another 5 – 8 minutes. At this point your water should be boiling so throw in your ravioli and allow to cook for the time indicated on the package. Drain, and put in the saucepan with the asparagus add your margarine and mix until everything is fully coated. Begin to plate, add your parmigiano flakes and Enjoy.

Then for the “secondo piatto”; our “second course” we chose to have some “Spiedini di Gamberi e Calamari con Asparagi alla griglia” which translates into “Shrimp and Calamari Skewers with grilled Asparagus”. It turned out wonderfully and a great end to the feast.


You’ll need:

10 Asparagus

1/4 lb Shrimp, peeled and deveined

4 Calamari, cut in 1/2 and ready to be skewered

Olive oil

Red pepper flakes (optional)

Salt and Pepper to taste

1 lemon, quartered

Turn on your grill to medium and allow to heat (I used my stove top grill because it’s snowing outside).

Steam your asparagus for about 5 minutes, set aside. Grab a medium bowl and throw in your shrimp and calamari, pour a little olive oil on top, add red pepper flakes, salt and pepper, mix it altogether and start to skewer, some shrimp, a calamaro, some shrimp; on to the next. Once you are finished you may bring over to the grill and allow to cook, about 5 minutes on one side and then flip; don’t overcook. Always remember that once the shrimp turns pink on both sides it’s cooked. Add your asparagus as well and allow same cooking time as skewers and then flip. Once your done plate, drizzle some olive oil over your asparagus and ad salt as well. Squeeze lemon over the skewers and enjoy this dish as well.

I hope that you guys have enjoyed the recipes. I know this looks like a lot, but it wasn’t; it was simple and we really enjoyed cooking and eating what we had made together, it was a nice experience and my husband was a wonderful help. We topped it off with a Chocolate “Bacio” and Tiramisu (but this recipe is to still to come).

We ended up watching Casablanca because neither of us had ever watched it and it was a nice stay at home, just us night. We figured that this is the last Valentine’s that we were going to have our house all to ourselves before the “little Buddha” comes and we wanted to enjoy it to the fullest…..and of course the fact that I just felt too lazy to go out in the cold weather with this belly and all. But it was nice to know that after being married for 7/12 years we can still enjoy each others company without having to necessarily go out, and without wine.

I willl say goodbye with this; This is what my Chocolate Bacio read last night:

P.s. I am about 23 and 1/2 weeks pregnant, sorry about the cleavage.

Try this: Delicious Tagliatelle ai Funghi (Tagliatelle with Mushrooms)

If you’ve been following my blog you know how much I love to eat healthy and when it’s vegetarian it’s all the better. I think that sometimes we do get the misconception that if it’s healthy it’s probably not quite as good or that it’s not going to curb that craving we are having at the moment for something not too healthy. Well, I can assure you that it is possible to have a delicious and healthy meal all at the same time!

As you already know I love mushrooms, they do have a reputation of being slimy, or too mushy; however the truth is that they aren’t. The mistake alot of us make when cleaning mushrooms is washing them. However, we are not supposed to wash mushrooms, (and please never, never soak fresh mushrooms) the way we are supposed to clean a mushroom is with a damp cloth, you should gently wipe away any dirt, and in the hard to reach places grab your marinade brush (make sure it’s dry) and gently brush away any excess dirt; voilà you have a clean and ready to cook mushroom. Mushrooms are very porous and moist already, so if you wash them they will absorb all the water and when cooked release all the liquid which in turn make it very soggy, cleaning it the right way will help the mushroom maintain a nice texture and also flavor.

In this recipe I use funghi Pleurotos, it’s a type of mushroom that is quite common here in Italy you can find it all the time at the grocery store. I have not ever seen it in the USA but I would replace it with a Portobello, Porcini or Champignon any mushroom you find should be fine. This is an easy and healthy dish, very few ingredients and time are required, but you’ll look like a million dollar chef. Enjoy!

Ingredients:

250 gr. Tagliatelle*

8 oz. of Mushrooms**

1 garlic clove

4 tbsp of Extra virgin Olive oil

a handful of chopped Parsley

grated Parmigiano Reggiano

Salt and Pepper to taste

crushed Chili pepper to taste (optional)

Place a pot of salted water to boil. In the meantime start cleaning your mushrooms, once they are clean you can slice into 1/4 inch thickness, if the stems are long remove the stem and slice separately then join together all sliced mushrooms and set aside.

In a medium or large sauce pan heat up your olive oil and join your garlic (whole but peeled). If you are using chili peppers you can throw in now as well. Allow the garlic to get golden and remove, throw in your mushrooms and let sauté at medium heat stirring occasionally (not too much). Also add salt; if you feel the need you may add a drop of water to the pan, so the mushrooms don’t stick.

By now your water should be boiling so throw in the Tagliatelle they should only cook for about 4 minutes (always follow box instructions). Drain the pasta and join to the mushrooms, mix together and turn off heat. Add the chopped parsley and pepper. Serve right away and top off with the Parmigiano Reggiano.

* If you don’t find Tagliatelle, you can use Papardelle, Linguine, or even Spaghetti.

** Whatever fresh mushroom you are able to find of course Porcini or Portobello is best but use what is fresh and available.


Low Fat and Low-Calorie: Zuppa alla Contadina (Farmers soup)

Vegetable soups are very popular here in Italy, it seems that anywhere you go you can order a delicious soup made with farm grown seasonal vegetables, light and just simple flavors cooked together and delicious. I love soups! But I do hate when they are more fattening than eating a piece of fried chicken.

Soups for me are something I choose to eat when I am trying to stay light, detox and stay warm, not for the opposite. Don’t get me wrong there are lots of soups out there that are just over the top and taste great, I don’t know like say chicken and dumplings, potato soup, tomato soup, etc… but one thing they all have in common is how heavy they are and how many calories are in them. I say if you really are craving it and that is all there is to eat then feel free (I’m no one to judge) but I just can’t justify eating it all the time; and for the amount of soups I eat and how I was raised in Italy with all these fresh low cal and delicious soups, the soups mentioned above just don’t even fase me, or exist in this country for that matter.

I am going to say that I have had them a couple of times while in the States and I do like them, but I definitely didn’t eat them if I was trying to be healthy or detox.
All this is to say that there are alternatives to soups not all of them are bad and heavy, they can be light, nutritious and perfect for a cold winter day. I hope that you enjoy this soup and lets all have a light and wonderful day!

Ingredients:

1/2 cup each of mixed dried Legumes, soaked over night (makes sure you have at least 5-7 different ones)*

½ cup Barley

1 Carrot

2 Celery stocks

1 Onion

1 Garlic clove

2 small Potatoes

1 sprig of fresh Thyme

1 sprig of fresh Rosemary

5 leaves of fresh Sage

2-3 Bay leaves

2 tbsp Extra Virgin Olive oil + ½ cup Extra Virgin Olive oil

Salt and Pepper to taste

Chop up your celery, carrot, onion, and potato into small cubes. Put a medium pot over medium flame and heat up 2 tbsp of olive oil, add the cubed, celery, carrot, onion and potatoes as well as your garlic clove peeled but still whole. Let cook for about 5 minutes, then throw in your soaked legumes and barley, mix together and add water, you always want to make sure when cooking legumes you add double the water (so if you legumes arrive to 1/4 of the pot add 3/4 water.)

Add bay leaves, salt and pepper and bring to a boil, lower heat and let simmer for 2 – 3 hours.

In the meantime chop up finely your thyme, sage and rosemary. Put 1/2 the cup olive oil over heat in a small pot or pan and add your thyme, sage and rosemary, allow oil to get hot and then turn off heat and let sit.

Once your soup has boiled and the legumes are cooked remove the bay leaves and grab 3 ladles and blend smooth rejoin the blended soup to the pot and mix. You may begin to plate once all are served get the aroma olive oil and drizzle over the bowl of soup and enjoy!

* I used: Adzuki beans, garbanzo beans, pinto beans, black-eyed peas, soy beans, dried split peas, dried lentils.


Homemade Artisanal Flat Buns (Vegan Friendly)

Snow, snow, snow, I’ve been in the house all week and I am actually enjoying it. I’m 5 ½ months pregnant right now so I’ve been able to catch up on some me time and experiment different recipes for you (the reader). It’s been nice; from reading, to cleaning, to working out, making a snowman, and cooking different things. I have actually gotten a lot of things out of the way that I probably wouldn’t have, had it not been snowing.

Well, I was online Friday late pm and I came across some biscuits and I all of a sudden got a craving for a nice warm biscuit with some honey on it. Go figure, I didn’t have anything in the house that resembled anything like a biscuit or the ingredients to make one. So, snow and all I figured that Saturday I would go to the little store up the street from the house and buy some of the ingredients to make them.

I woke up and of course didn’t have the craving for a delicious warm biscuit, but we however decided that we would go to the store and buy a few fresh veggies for a nice soup. It was gorgeous out, the snow was falling and it was all white outside, I got geared up and we walked up the street. In the store we decided that we should get some nice warm bread; as you can imagine there was a line because I think most people were out of food. The lady before us ended up getting the last 5 pieces of fresh bread, so my Husband and I turned around and I got the ingredients and decided that I would do an in-between of biscuits and bread and this is how this recipe was brought to life.
They were delicious and light, nothing too heavy and perfect with the homemade preserve I had bought last week.

Perfect for a snowy and cold day. The best thing is that I had never attempted to make bread so this was a good step for me. I think these would be great with honey, preserves, peanut butter, eggs at breakfast, a small sandwich, and anything that you can think of.

Please enjoy!

Yields 15 buns

Ingredients:

4 cups flour

2-½ tbsp. sugar

1 tsp. salt

1 packet dry Yeast

1-½ cups warm water

3 tbsp. melted margarine or butter (olive oil is an option as well)


Let yeast set in warm water for 5 minutes

Mix dry ingredients together first and then add the yeast mixture.

Roll out on a lightly floured flat surface to about ¼ inch thickness, then cut into buns with round cookie cutter or biscuit cutter. (I made them just a tad bigger than a biscuit)

Place on baking sheet, brush margarine on top and cover with cloth and let rise for about 1 hour.

Bake at 400° F (200° C) for about 12 minutes or until top is golden brown.

Indulge with these Simple and Delicious Sinnamon Rolls

Now, I am no sweet tooth, I am more of a salty snacker/craver. But it was snowing here and all I could think of was that I wanted to bake something that I had never baked before. Living in the United States I had the pleasure of being introduced to Cinnabon, to me its one of those sweets that I honestly think are perfect if you are planning on indulging, now the last time I had one was probably back in 2007 and it was delicious and worth every bite. I have had bites here in there of Cinnamon buns, but not a Cinnabon.  My husband is an American and a sweet tooth that loves pretty much anything sweet. So I thought that it would be nice to bake him an American dessert considering that he hasn’t had one in a while, there is not a lot of things that he misses as far as food goes because he seems to love the Italian food, but there is the occasional thing that he misses. His Mom is an excellent baker and makes all sorts of delicious desserts for him when we go to visit, she generally makes his favorite which is Cheesecake, or seven layer bars, or cookies and always has his favorite chocolate which are Reese’s Peanut Butter Cups. So, I thought what better way to make him happy than with a good ol’ Cinnamon bun and have a little indulgence myself considering that the last time I had a Cinnabon was 6 years ago.

It was snowing outside so I decided that whatever I had in the house would have to work. I didn’t have yeast so I would have to make them with Baking powder, and then I didn’t have cream cheese so I would have to find another way to make the frosting….Powdered Sugar it was! They turned out delicious and they were so easy. I was so proud at my first attempt ever to make these and how great they turned out that I decided to share it with you.

Please know that I do not recommend you eat these all the time, they still are fattening but it’s winter and we sometimes have to give in to our cravings all the while knowing that we’ll have one not the whole pan. Enjoy!

Makes 16

Ingredients:

For the dough: 3 cups flour – 2 tbsp sugar  – 1 1/2 tsp. baking powder – 1/2 tsp. baking soda – 1/2 tsp salt – 1 cup milk – 1 tbsp lemon juice – 5 tbsp butter melted.

For the filling: 3/4 cup brown sugar – 1/2 cup granulated raw sugar – 1 1/2 tbsp cinnamon – 2 tbsp butter melted.

For the topping: 1 1/2 cup powdered sugar – 1 tsp vanilla – 1 1/2 tbsp milk.

Preheat the oven at 425° (220° C)
Combine all the filling ingredients in a bowl and make sure it remains grainy.

In a smaller bowl mix the milk with the lemon juice and let sit.

In a separate bowl combine flour, sugar, baking powder, baking soda, salt and stir together. Now pour in the milk mixed with the lemon and the melted butter, stir until well combined (not too much) knead with your hands until dough becomes a ball and slice in half.  On a lightly floured surface grab one 1/2 of the ball and begin to roll out into a rectangle; pour 1/2 of the filling evenly on the center avoiding the edges, roll into a sausage trim the edges and cut into 8 slices, repeat same with the other half.
Place in a non-stick pan, (if you want you can put Baking paper underneath and up the edges) or just put butter at the bottom. Once they are all in (they can touch) brush the tops with remainder 1 tbsp melted butter.
Bake for 15 minutes or until tops are golden.
Meanwhile prepare the icing whisk all ingredients together until slightly thick but a pourable consistency.
Pour evenly over the cinnamon rolls while still hot and enjoy.